程式安全-人臉辨識
-
人臉辨識
原始圖片

face.png - 實作1-顯示圖片
import cv2
from google.colab.patches import cv2_imshow # Import cv2_imshow from google.colab.patches

img = cv2.imread('face.png')   # 開啟圖片,預設使用 cv2.IMREAD_COLOR 模式
cv2_imshow(img)                # Use cv2_imshow instead of cv2.imshow to display the image
cv2.waitKey(0)                 # 按下任意鍵停止
cv2.destroyAllWindows()        # 結束所有圖片視窗
執行結果

- 實作2-顯示灰階圖片
import cv2
from google.colab.patches import cv2_imshow         # Import cv2_imshow for Colab

img = cv2.imread('face.png', cv2.IMREAD_GRAYSCALE)  # 使用 cv2.IMREAD_GRAYSCALE 模式
cv2_imshow(img)                                     # Use cv2_imshow instead of cv2.imshow
cv2.waitKey(2000)                                   # 等待兩秒 ( 2000 毫秒 ) 後關閉圖片視窗
cv2.destroyAllWindows()
執行結果

- 實作3-人臉辨識
文件 haarcascade_frontalface_default.xml
import cv2
from google.colab.patches import cv2_imshow # Import cv2_imshow for Colab display

img = cv2.imread('face.png')
gray = cv2.cvtColor(img, cv2.COLOR_BGR2GRAY)   # 將圖片轉成灰階

face_cascade = cv2.CascadeClassifier("haarcascade_frontalface_default.xml")   # 載入人臉模型
faces = face_cascade.detectMultiScale(gray)    # 偵測人臉

for (x, y, w, h) in faces:
    cv2.rectangle(img, (x, y), (x+w, y+h), (0, 255, 0), 2)    # 利用 for 迴圈,抓取每個人臉屬性,繪製方框

cv2_imshow(img) # Use cv2_imshow instead of cv2.imshow for display in Colab
cv2.waitKey(0) # 按下任意鍵停止
cv2.destroyAllWindows()
執行結果

- 實作4-五官辨識
文件
眼睛特徵模型:haarcascade_eye.xml
嘴巴特徵模型:haarcascade_mcs_mouth.xml
鼻子特徵模型:haarcascade_mcs_nose.xml
import cv2
from google.colab.patches import cv2_imshow # Import cv2_imshow for Colab display

img = cv2.imread('face.png')
gray = cv2.cvtColor(img, cv2.COLOR_BGR2GRAY)                       # 圖片轉灰階
#gray = cv2.medianBlur(gray, 5)                                    # 如果一直偵測到雜訊,可使用模糊的方式去除雜訊

eye_cascade = cv2.CascadeClassifier("haarcascade_eye.xml")         # 使用眼睛模型
eyes = eye_cascade.detectMultiScale(gray)                          # 偵測眼睛
for (x, y, w, h) in eyes:
    cv2.rectangle(img, (x, y), (x+w, y+h), (0, 255, 0), 2)         # 標記綠色方框

mouth_cascade = cv2.CascadeClassifier("haarcascade_mcs_mouth.xml") # 使用嘴巴模型
mouths = mouth_cascade.detectMultiScale(gray)                      # 偵測嘴巴
for (x, y, w, h) in mouths:
    cv2.rectangle(img, (x, y), (x+w, y+h), (0, 0, 255), 2)         # 標記紅色方框

nose_cascade = cv2.CascadeClassifier("haarcascade_mcs_nose.xml")   # 使用鼻子模型
noses = nose_cascade.detectMultiScale(gray)                        # 偵測鼻子
for (x, y, w, h) in noses:
    cv2.rectangle(img, (x, y), (x+w, y+h), (255, 0, 0), 2)         # 標記藍色方框

# Replace cv2.imshow with cv2_imshow
cv2_imshow(img)  # Use cv2_imshow instead of cv2.imshow to display the image in Colab
cv2.waitKey(0)   # 按下任意鍵停止
cv2.destroyAllWindows()
執行結果

- 實作5-資訊分析
!pip install deepface程式
import cv2
from deepface import DeepFace
import numpy as np
from google.colab.patches import cv2_imshow # Import cv2_imshow for Colab display


img = cv2.imread('face.png')
try:
    emotion = DeepFace.analyze(img, actions=['emotion'])  # 情緒
    age = DeepFace.analyze(img, actions=['age'])          # 年齡
    race = DeepFace.analyze(img, actions=['race'])        # 人種
    gender = DeepFace.analyze(img, actions=['gender'])    # 性別

    print(emotion[0]['dominant_emotion'])
    print(age[0]['age'])
    print(race[0]['dominant_race'])
    print(gender[0]['gender'])
except:
    pass

cv2_imshow(img) # Use cv2_imshow instead of cv2.imshow for display in Colab
cv2.waitKey(0)
cv2.destroyAllWindows()
執行結果
happy
28
white
{'Woman': 0.0007532069048465928, 'Man': 99.99924898147583}
實作6-網格分析
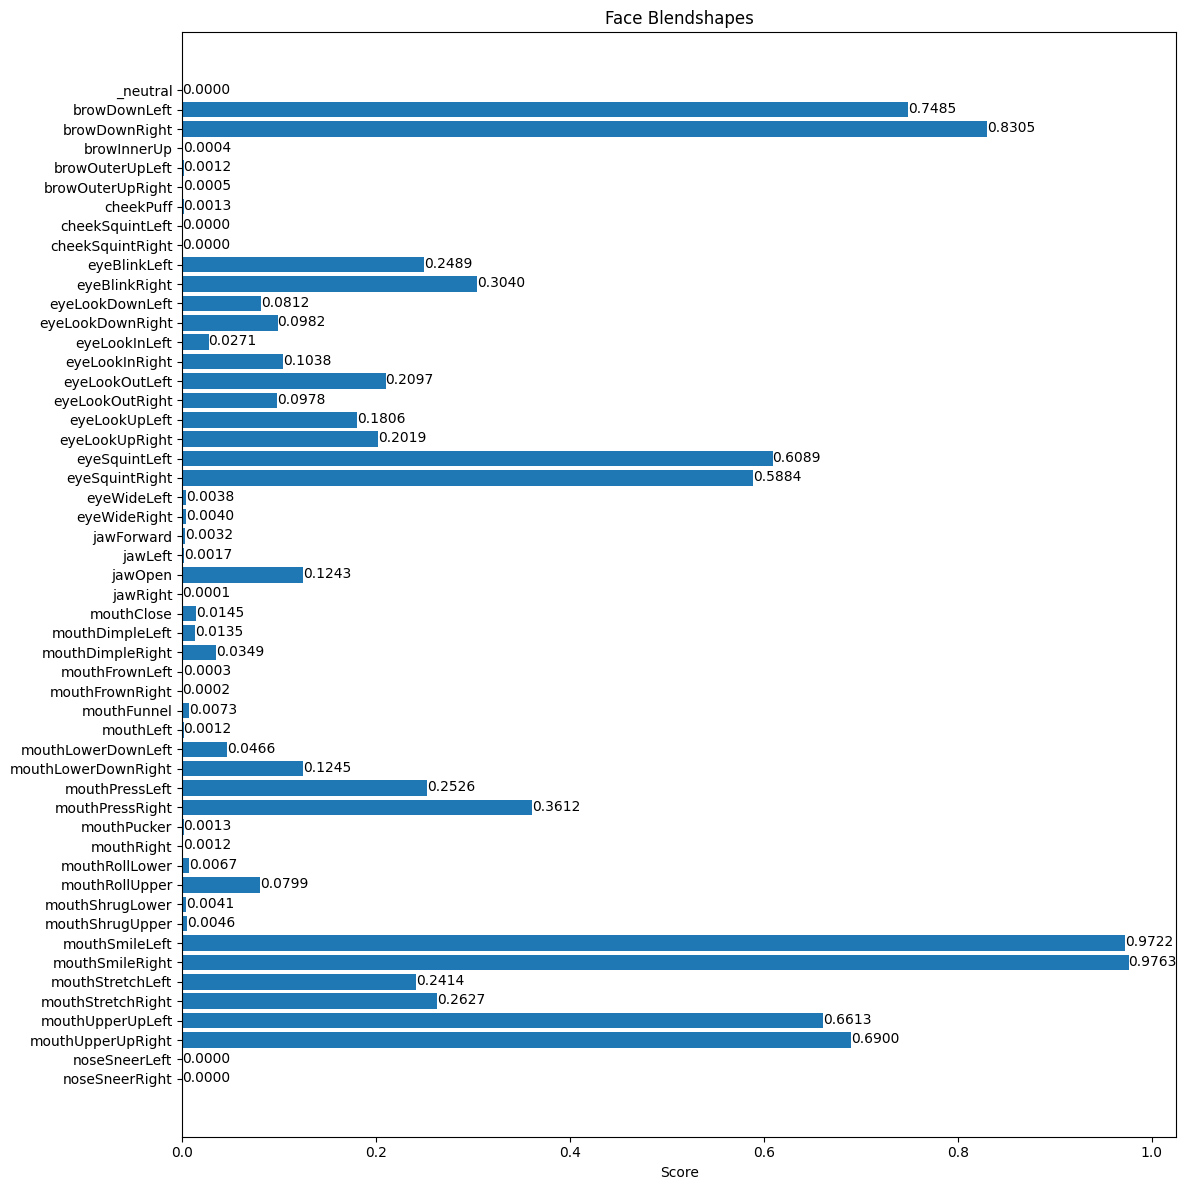
!pip install -q mediapipe!wget -O face_landmarker_v2_with_blendshapes.task -q https://storage.googleapis.com/mediapipe-models/face_landmarker/face_landmarker/float16/1/face_landmarker.task#@markdown We implemented some functions to visualize the face landmark detection results. <br/> Run the following cell to activate the functions. from mediapipe import solutions from mediapipe.framework.formats import landmark_pb2 import numpy as np import matplotlib.pyplot as plt def draw_landmarks_on_image(rgb_image, detection_result): face_landmarks_list = detection_result.face_landmarks annotated_image = np.copy(rgb_image) # Loop through the detected faces to visualize. for idx in range(len(face_landmarks_list)): face_landmarks = face_landmarks_list[idx] # Draw the face landmarks. face_landmarks_proto = landmark_pb2.NormalizedLandmarkList() face_landmarks_proto.landmark.extend([ landmark_pb2.NormalizedLandmark(x=landmark.x, y=landmark.y, z=landmark.z) for landmark in face_landmarks ]) solutions.drawing_utils.draw_landmarks( image=annotated_image, landmark_list=face_landmarks_proto, connections=mp.solutions.face_mesh.FACEMESH_TESSELATION, landmark_drawing_spec=None, connection_drawing_spec=mp.solutions.drawing_styles .get_default_face_mesh_tesselation_style()) solutions.drawing_utils.draw_landmarks( image=annotated_image, landmark_list=face_landmarks_proto, connections=mp.solutions.face_mesh.FACEMESH_CONTOURS, landmark_drawing_spec=None, connection_drawing_spec=mp.solutions.drawing_styles .get_default_face_mesh_contours_style()) solutions.drawing_utils.draw_landmarks( image=annotated_image, landmark_list=face_landmarks_proto, connections=mp.solutions.face_mesh.FACEMESH_IRISES, landmark_drawing_spec=None, connection_drawing_spec=mp.solutions.drawing_styles .get_default_face_mesh_iris_connections_style()) return annotated_image def plot_face_blendshapes_bar_graph(face_blendshapes): # Extract the face blendshapes category names and scores. face_blendshapes_names = [face_blendshapes_category.category_name for face_blendshapes_category in face_blendshapes] face_blendshapes_scores = [face_blendshapes_category.score for face_blendshapes_category in face_blendshapes] # The blendshapes are ordered in decreasing score value. face_blendshapes_ranks = range(len(face_blendshapes_names)) fig, ax = plt.subplots(figsize=(12, 12)) bar = ax.barh(face_blendshapes_ranks, face_blendshapes_scores, label=[str(x) for x in face_blendshapes_ranks]) ax.set_yticks(face_blendshapes_ranks, face_blendshapes_names) ax.invert_yaxis() # Label each bar with values for score, patch in zip(face_blendshapes_scores, bar.patches): plt.text(patch.get_x() + patch.get_width(), patch.get_y(), f"{score:.4f}", va="top") ax.set_xlabel('Score') ax.set_title("Face Blendshapes") plt.tight_layout() plt.show()import cv2 from google.colab.patches import cv2_imshow img = cv2.imread("face.png") cv2_imshow(img)# STEP 1: Import the necessary modules. import mediapipe as mp from mediapipe.tasks import python from mediapipe.tasks.python import vision # STEP 2: Create an FaceLandmarker object. base_options = python.BaseOptions(model_asset_path='face_landmarker_v2_with_blendshapes.task') options = vision.FaceLandmarkerOptions(base_options=base_options, output_face_blendshapes=True, output_facial_transformation_matrixes=True, num_faces=1) detector = vision.FaceLandmarker.create_from_options(options) # STEP 3: Load the input image. image = mp.Image.create_from_file("face.png") # STEP 4: Detect face landmarks from the input image. detection_result = detector.detect(image) # STEP 5: Process the detection result. In this case, visualize it. annotated_image = draw_landmarks_on_image(image.numpy_view(), detection_result) cv2_imshow(cv2.cvtColor(annotated_image, cv2.COLOR_RGB2BGR))執行結果

plot_face_blendshapes_bar_graph(detection_result.face_blendshapes[0])執行結果

print(detection_result.facial_transformation_matrixes)執行結果

議題討論-人臉辨識的隱憂
文章來源:https://ithelp.ithome.com.tw/articles/10276505
在人臉辨識的興盛下,如同科技進步一般,水能載舟,亦能覆舟,有如此多的優點也會也缺點,如先前講的隱私權及要如何確保每次辨識下都是正確的,換句話說就是辨識時的不穩定。
1.隱私權:
在模型進行訓練時就需要大量資料來進行訓練,所以需要很多人臉的資料,在資料的收集就十分困難,目前就有使用收集意修資料後,用這些資料來產生訓練資料,就是生出假的人臉,使用先前收集的資料學習組合成一張以假亂真的臉,或是使用資料增量的方式來增加訓練資料,如不同的光影變化,或是使用3D建模的方式來擷取人臉的不同角度,讓可以偵測的角度變大。2.辨識時的不穩定:
使用更加完善的模型架構,如前面所提到的各種人臉常用模型,或是使用更強健的演算法來降低辨識不穩定的發生率,因為人臉的變化有光線、角度、年紀、化妝等可以改變人臉外表的因素,維持辨識的穩定,可能需要在辨識時持續更新或增加資料庫的影像。在未來人臉辨識系統發展,可以有更強大的辨識系統來突破這些限制,使人類的生活更加便利。